For many self-builders and home improvers underfloor heating (UFH) is now the preferred method of emitting heat, but it’s a good idea to get to know how it works to get the most (the lowest energy bills possible) out of your system.
You may remember UFH from the 1960s, when it was installed with inadequate materials and in poorly insulated homes. This led to heating systems having to work extremely hard to compensate for the constant heat loss through the building fabric, resulting in floors getting too hot and high energy bills. Half a century later, these problems have been overcome. In fact with materials that are now fit for purpose, system designs that are tailored to your building, and reasonable costs, it seems UFH is even going through a bit of a renaissance.General overview
- The vast majority of systems use warm water in pipes; electric cable or mats have a very small market share because running costs (cost of electricity) are high. They are particularly popular in the case of small retrofit projects, such as bathrooms or small extensions where adding floor depth may be an issue. The capital cost can be relatively low with electric mats and even though you will need an electrical input there is no plumbing required.
- Hot water systems use high tech plastic pipes containing water heated to between 25- 45degC. Screeds generally should not be heated beyond 50degC and some anhydrite screeds must be kept below 45degC, the controls will help ensure this is the case. The screed helps to support the pipes, hold them clear of the insulation and encourage good contact between the outer surface of the pipe and the floor screed for evenness of heating. The screed acts as a thermal store and, with thermostatic digital controls, the system should be economic to run, reliable and virtually maintenance free. In other words, it will provide the right amount of heat at the times when it is needed and in the cheapest way possible.
- The screed creates a high thermal mass which, from cold, can take anything from one to three hours to heat up when first commissioned, but don’t be put off by this! Thereafter, it will take about one hour. Accurate and easy to work programmable thermostats and weather compensating controls on the heating system are essential if you want to get the best response and lowest heating bills possible.
- There are two options when it comes to a solid floor buildup: the first uses high mass floors to store more heat, the second uses very low mass floor structures for a quicker response time.
- The type of top floor covering – carpet, wood, tiles etc. – must be included in the calculations when designing the system. You can choose any type of floor covering as long as you don’t use an insulant (e.g. foil backed and other types of underlays to be avoided) or some glues.
- And for the (very) occasional day when it feels too hot inside in summer, remember that the system can be used to cool the house as well. However this requires that the heat generator, typically a heat pump, has cooling capacity and that there is anti-condensation controls in place to prevent the screed dropping to dew point which would result in moisture on the floors. Another unlikely but possible use is outdoor UFH for ramps and other access areas that may be prone to frost. The cost is arguably prohibitive to use in a home setting, especially considering our mild Irish weather.
Is it cost effective?
UFH used to be quite a bit more expensive to install than a radiator system but now the cost is comparable. And with fewer draughts (radiators will circulate hot and cold air due to temperature differences) and less wasted heat at ceiling level, UFH is considered more cost effective to run than other heat emitting sources. Suppliers say the savings are in the order of 15 to 25 per cent. It has been measured that to achieve a temperature of 21degC at shoulder height with radiators the average room temperature needs to be about 23degC. With UFH this figure drops to 21degC. The floor itself should be a comfortable 24 to 27 degC. When used in conjunction with a condensing boiler, there are further efficiencies because a condensing boiler works best when the return temperature from the heating system is below 55degC as in UFH. With heat pump technology, the lower the temperature that the heat pump produces the more efficient it is, using UFH with heat pumps allow for the lowest supply temperature to the floors possible and thus the best possible efficiency from the heat pump. A modulating heat pump or modulating gas condensing boiler is best because it will adjust its heating output to allow for the faster warm up time of the fabric. UFH also works well with solar panels due to the low temperature required. UFH appeals also to those who wish to run a more fuel efficient heating system, but, in practice, sometimes the gains are not as great as anticipated because, human nature being what it is, the even and comfortable heat generated tends to make people use it more! Some users of UFH have found it can guzzle energy – the reason for this is often the way in which it was installed. Under earlier building regulations the required insulation level for the floor was not as good as it is now causing a lot of the heat to be lost to the ground. Also it can be related to how it is used and to system sizing (conservatories may require a radiator to offer that blast of heat you may be looking for in winter!). UFH does not work like radiators. You shouldn’t be turning it on and off – if the house is occupied the system should be left running constantly with the controls adjusting the temperature levels. There is no blast of heat with UFH. You will not feel heat but you will feel comfortable in the room. So if you crank up the thermostat on the underfloor heating you will be forcing it to work at a higher temperature, which is not an efficient (i.e. an expensive) way to heat the room. Also if you force too much heat, the room will then continue to be warm long after you’re left it, even if you’ve switched it off as heat is stored in the floor. So yes, it can be very cost effective but make sure you get well acquainted with how it works and with your controls – these should run automatically and ideally be linked to the weather.
Finding the right supplier
There are many companies that offer UFH products, and they will provide the engineering services associated to sizing the system. There are self-build kits available and your supplier should give you full drawings in electronic format (Computer Aided Design) to assist you in the installation. But be aware that the wiring of the controls (different for each room, the hot water, and perhaps a towel rail) is possibly the most demanding part and requires an experienced electrician or an UFH specialist. Each vendor will sell a specific product and be trained in its use and commissioning so check out the company that’s behind the product too (the pipes and systems are often imported). Check who the contract for the materials is between. It’s often the manufacturer and the merchant, which could give problems if the system does not perform as it should. Does your installer have up to date Professional Indemnity insurance against which you can claim should the need arise. Ask for a performance rating, with minimum guarantees on temperature and fuel consumption. And while there are no trade bodies that deal specifically with underfloor heating in Ireland you should be careful to choose a supplier with some form of accreditation or alliance to an ancillary association (e.g. in renewable heating, installers may be MCS vetted in NI for instance) and of course do your homework: how long they’ve been in business (a minimum of two years) and what their warranties are like. Also talk to previous clients and see how their system is working out now that it’s in place. If your room layout is unusual and contains alcoves and angles, try to see previous work handling similar situations. Ask your supplier for a good plan of the layout, together with electrical wiring details, a pressure test for each circuit, instructions for the commissioning of the system if it is not being installed by the supplier, help contacts, insurance against failure and product liability making sure the work is covered by an up to date guarantee for materials, workmanship and performance, backed by third party insurance and with consequential loss included, for example if the pipe fails and the ceiling comes down, or an expensive floor is damaged. Insurance should be provided by a guarantor independent of the supplier.There is no blast of heat with UFH. You will not feel heat but you will feel comfortable in the room. So if you crank up the thermostat on the underfloor heating you will be forcing it to work at a higher temperature, which is not an efficient way to heat the room (expensive).
How It Works
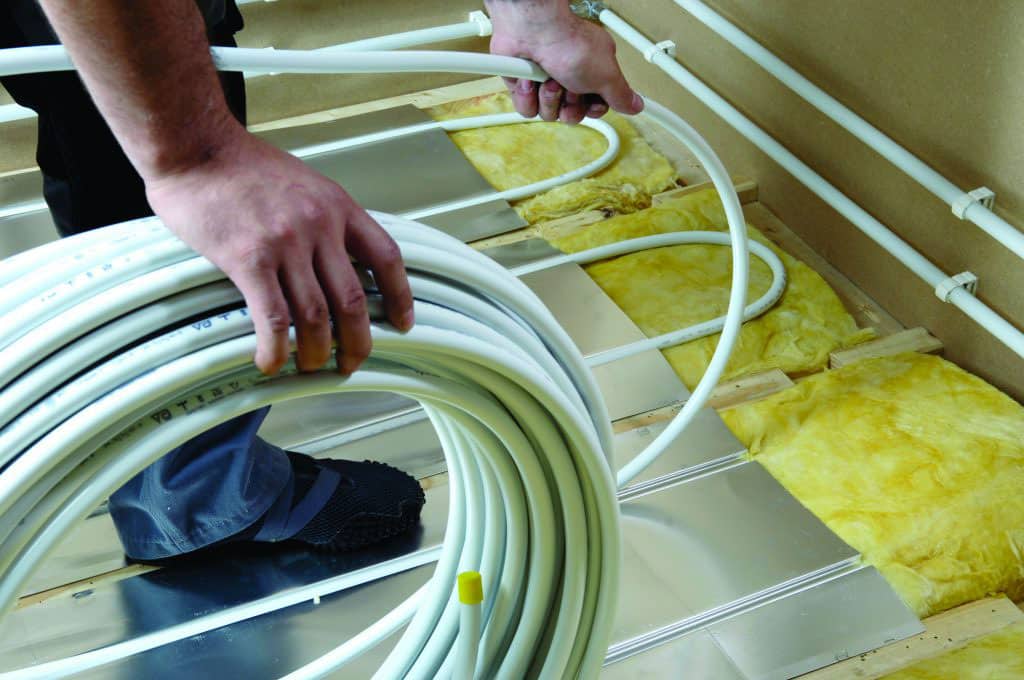
Very simply, insulation is laid down first to ensure that the heat travels upwards into the room and not down into the ground, then piping is laid on top, usually a wet screed covers the piping, after that comes your chosen finish, e.g. floorboards, carpet, tiles etc. If you’re working at floor level, insulation around the perimeter is added to ensure heat does not escape through the walls. With solid floors it’s preferable to insulate between the slab (the concrete that’s laid directly on top of the radon barrier/damp proof course) and the screed as insulating below the slab means the entire floor structure has to be heated thus giving a slow response time and heat is often lost through outside walls as well, unless insulation has been incorporated in the subfloor. Good contact between the heating elements (pipe or electric cable), and the upper surface of the floor is essential to get the best from the system. Air gaps should be avoided as air acts as an insulator. Electric: uses cables or mats incorporating heating wires (sheathed in metal) or ribbons (unsheathed), connected to the consumer unit/distribution board. It is arguable that, because the ribbons are wide and cover at least 25% of the floor area, this results in a more energy efficient, quicker and cost effective system. The sheathing is there primarily for strength, not to prevent electric currents transferring to humans should a needle, for example, be pushed through the top covering and make contact with the wires below. To guard against this, all electric UFH systems should be fitted with an RCD (residual current detector) or GFCI (ground fault circuit detector). Each unit should be tested as it is laid. The mats are laid under a screed or boarding or tiles directly, using these as a heat store. Hot water (hydronic): a hot water UFH system is very similar to a radiator based one with boiler, hot water cylinder and valves. The only difference is how the heat goes into the room, via the floor instead of radiators, and the lower flow temperature. Each area, usually a single room, has its own branch to the manifold, called a circuit. The flow of water is controlled by a thermo actuator on the valve for this circuit, with the actuator being controlled by a room thermostat.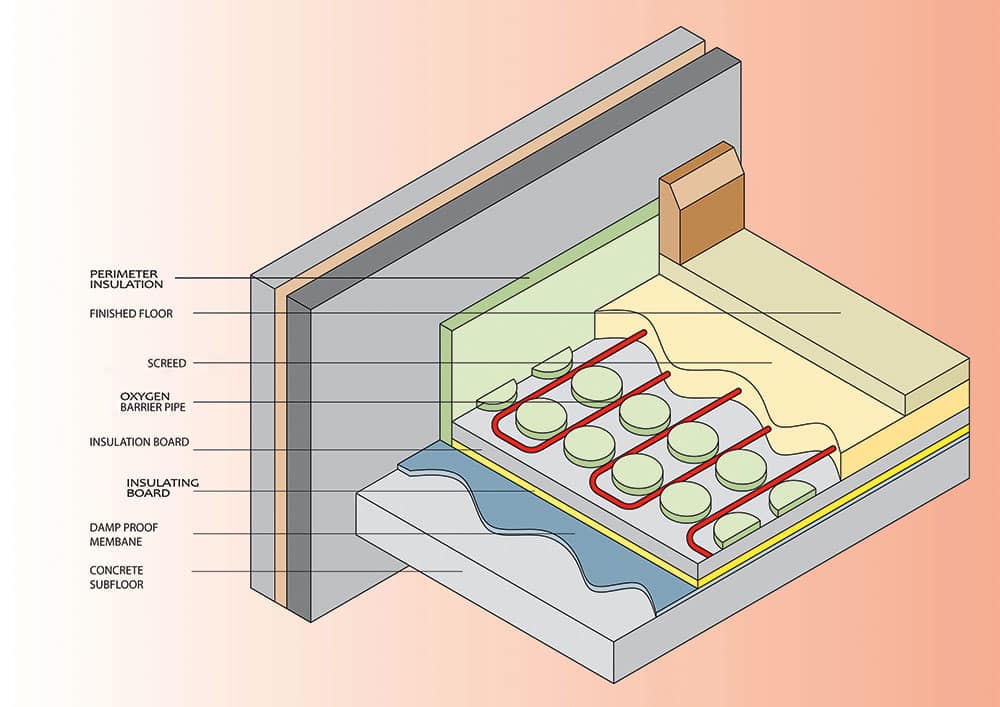
Good Design Guide
UFH looks simple to install and it is normally quicker to do than a radiator based system. But the essence of simplicity is that it hides a lot of hard work. The first step is to work out the heat loss for each room, remembering to omit losses through the ground. In today’s highly glazed, well insulted, living areas, solar gains are factored in too. Next choose the form of UFH best suited to your floor type and, from the top floor covering, the heating output required. Sometimes there is one room, often the bathroom, where the output is not quite sufficient at normal pipe spacing so it is often reduced to ensure a greater heat output. When a boiler is being used it is an option to top it up with a radiator or heated towel rail as the boiler would have an output temperature more suited to a single radiator than a heat pump system. Another option is a standalone electric radiator. If you have very large expanses of double glazing, you may want to consider adding trench heaters to prevent it feeling chilly in winter when sitting near the windows. In fact as well as running the UFH and possibly radiators and other heat emitters, the heat generator will usually have to provide hot water as well. For most installations a heat generator sized to do both simultaneously works well because the lower heat output of UFH means that it is able to cope far better with dual demand. If you wish, there are heat generators with controls which can be set to give priority to the hot water, something of particular interest to households with teenage children perhaps… With warm water UFH, temperature control is essential to keep the floor constantly warm. This is achieved by fitting a two or three port mixer valve to combine both flow and return water. Heat pumps and more advanced gas boilers have a modulating burner to achieve the same. Controls are critical, as is the efficient and effective running of the system with a 24 hour programmable thermostat in a well insulated building (so that it is more cost effective for the structure to hold the heat instead of being constantly warmed up and allowed to go cold.) Weather compensation controls allow for changes in the outside temperature to adjust the UFH flow temperature; this ensures the system is running at its most efficient level at all times and are a wise investment. Individual room control with a programmable thermostat, especially in a dwelling that is not open plan and has bedrooms on an upper floor also with UFH, is the way to achieve the right comfort levels at the lowest cost possible. For example, bedrooms should be about 18degC, living rooms 21degC and bathrooms 24degC. With a programmable thermostat you can set it to different temperatures for different times of the day and not waste heat in rooms not being used, because with UFH each room has its own circuit, controlled from the manifold. Knowing the amount of heat you will require (hence the importance of the room by room heat loss calculation), is of course the basis for sizing the system. With increasingly well insulated houses, and especially those that are well sealed and with mechanical ventilation, there is often no need to heat the upper floor regularly. A small electric heater to top up the warmth rising from below on occasion may be more cost effective. Broadly speaking in a well insulated house, built to today’s standards, you will need 20 to 30 W/sqm but in an older building you may need double that or more so in a retrofit scenario you may need to consider supplementary heating. Most UFH systems will supply between 70 and 100 W/sqm, an output that can be dampened by the choice of floor covering. Tiles and stone are ‘neutral’ which is why in the early days they had the reputation of being the only possible floor covering for UFH. The type of insulation and how much to use depends upon the floor structure and Building Regulations in a new build (maximum heat loss U-value permissible 0.25W/sqmK in NI and 0.21 W/sqmK in ROI; 0.15W/sqmK is considered ‘adequate’ in ROI for floors with UFH), and in a retrofit, the space available (or U-value of 0.45W/ sqmK if the ground floor is being replaced in ROI, in NI if introducing new thermal elements 0.22 W/sqmK and if upgrading or renovating 0.70W/sqmK or 0.25W/sqmK depending on your project).The set up
Pipe in screed An insulation board with pipes attached is laid on a sub floor with extra insulation around the perimeter of the room. A screed of 65mm to 95mm is poured over which must be allowed to dry out completely before putting down any fixed flooring. Some installers add a polythene barrier above the insulation (before laying the pipes) to ensure the screed does not set between the insulation boards (in a perfect world the insulation would be continuous); this is to avoid a cold bridge between the screed and subfloor. This type of installation is the most common in Ireland with, usually, a solid concrete slab base. Other bases include suspended concrete slabs or beam and block. A metal mesh is often incorporated with the screed to help maintain the position of the pipes and clips; in addition it provides a useful first line of defence against the onslaught of the builder’s wheelbarrow! It is also an aid to conductivity. Cutting mesh does take some effort and it may not lie flat at first, but any ripples will be ironed out by the weight of the screed on top. Other products incorporate a mechanism for holding the pipe into the insulation so that you do not need staples, clip rails or moulded system plates. The sides of the pockets can be shaped so that the screed is encouraged to make good contact with, and wrap right around, the pipe, thus achieving good heat transfer. It also means that screeds can be wheelbarrowed across the floor more easily without damaging the pipes. Where the pipes are clipped in place, use a foil faced board if there is an air gap, to improve heat transfer, but this is not necessary if the pipes are to be covered by a screed, as described earlier. Expanded polystyrene is cheapest if there’s plenty of space, otherwise choose from polyisocyanurate, urethane or phenolic foam as these have the lowest thermal conductivity and therefore the insulation layer does not need to be as deep. During installation bear in mind that the clip rails are at risk of being knocked out by the person pouring the screed, resulting in a sea of rapidly setting screed with pipes adrift from their moorings. More subtle is the loosening of a single clip, not obvious at first but, as the screed dries, a straight line appears signalling a length of pipe that has floated to the top. Proper workmanship by the installer, by using the correct amount of clips and/ or tracking rails, should however ensure that this is not an issue. Pipe in insulation Extruded polystyrene insulation has channels pre cut into it with factory fitted aluminium heat diffusers and a polythene film over the top surface, thus you are laying a fully floating floor. Sometimes a screed is infilled between the pipes to act as a heat diffuser instead of the aluminium. Using aluminium plates makes for a quicker response time, it’s quicker to lay and there’s no waiting for the screed to dry. The screed option has a lower capital cost and slightly better heat output. Extruded polystyrene has the advantage of being able to support a fully floating floor (whereby the insulation carries the weight of the covering) and is a better insulator than the cheaper alternative, expanded polystyrene which requires battens around the edge of the floor to hold it in place, both of which add to the basic cost so make sure to include these when budgeting. Pipe in board This is standard flooring grade chipboard or plywood panels manufactured with an integral pipe. Panel modules Speedy to lay and with an excellent heat output, pre-piped and pre-folded these can be used in floors, walls, ceilings and from underneath a floor.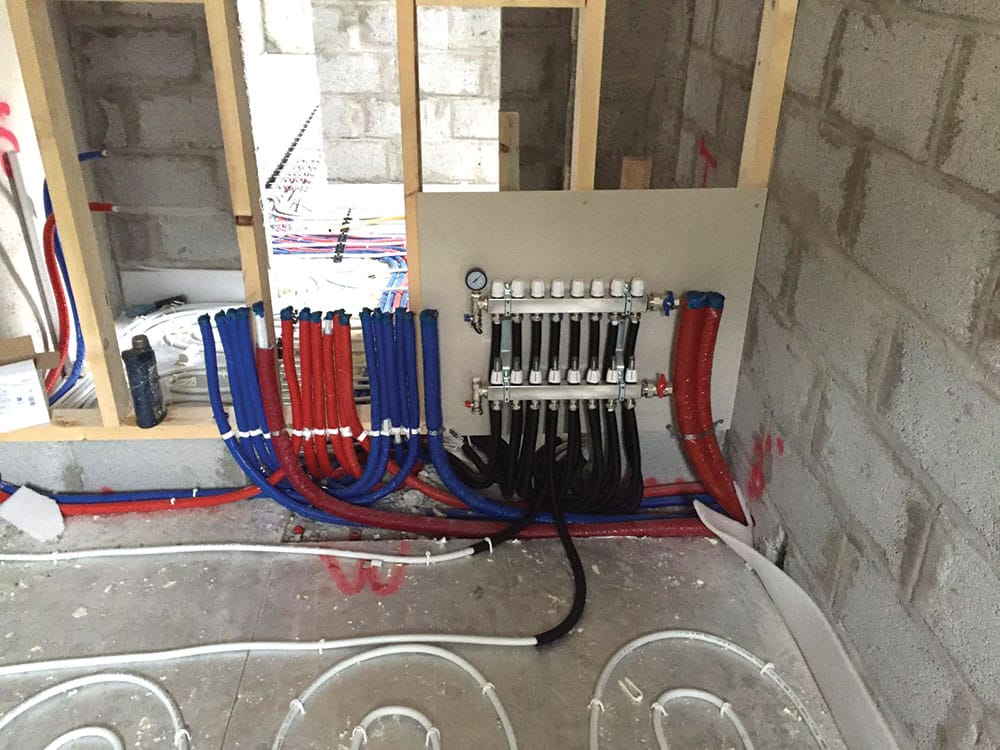
Can it be installed in an existing house?
There is a misconception that UFH is only for new builds but just because you’re not starting with a greenfield site doesn’t mean you can’t have UFH. The main obstacles have to do with how well insulated your house is, if it’s not you may have to top up some of the rooms with other heat sources or preferably retrofit the house with additional insulation, and with the way the house was constructed. If you can get access from below or the top floor covering can be lifted, an existing suspended timber floor can be fitted with any of the UFH configurations, and the floor height will be unaffected. An increase in floor height does happen when retrofitting on a solid floor with warm water UFH because the minimum increase to allow for the pipes is 50mm, with pipes set into plates. However there are panel module products that can now offer a height increase of just 15mm using 12mm pipes or 30mm when using standard 16mm pipes. This difference in floor level can create problems for doors, skirtings, sockets etc. Electric mats are possibly the best option where space is tight as they can be laid on a very thin layer of insulation. Even with a double layer, using the ribbon type of mat results in a thickness of no more than 2.2mm. In any case with an existing floor, if the floor insulation is not sufficient it would mean that the UFH system would be inefficient to run. UFH systems can bolt on to existing radiator pipe work and are therefore suitable for a single room, such as an extension. In the case of a conservatory while the heat gains in summer will be high in winter you may need a supplementary heat source to make the space comfortable.Specific arrangements for suspended timber floors
Suspended timber floors have timber joists spanning between the walls; these joists are then covered with floorboards or chipboard. The UFH pipes run parallel to the joists which are notched to allow the pipes to cross over. At ground floor level this arrangement can cause a few problems, especially in systems where the design heats an air space below the floorboards/chipboard (the space below the joists is ventilated to keep them dry and prevent rot). Super thin, foil faced and flexible insulation is stapled to the joists, but remember that it is the performance of the material that is of greatest importance. If the insulation gets squashed or there are air gaps then its effectiveness will be compromised. Further problems can occur from fitting square edged planks (as opposed to tongue and groove) over the battens or joists because the dry, warm air in the void in turn dries out the planks above and these reduce in width. As they do, the gaps between the planks widen and heated air escapes into the space above. The net result is a low power, warm air heating system which, in our air leaky houses, tends not to be very effective. In an attempt to get a better temperature, users turn up the temperature but this only makes things worse by drying out the planks even more and increasing the gaps. The options for suspended timber floors, both at ground floor and upper floor levels, are: Pipe in plate Warm water UFH pipes held in place by aluminium or steel diffusion plates sitting across the joists with heat transferred from the pipe through the diffuser, which is in direct contact with the chipboard sub floor above. Below these lies a layer of insulation and the output should be about 50W/sqm. The contact between the plates and the chipboard is not 100% and so some of the energy will be heating air. The impact of this largely depends upon the finished floor surface. Pipe on insulation Warm water UFH pipes are laid on insulation suspended between the floor joists. There must be good contact between the pipes and the underside of the floor otherwise this arrangement will lead to the warm air situation described above. The heat output is generally 20 to 30W/sqm. Pipes suspended in void This system avoids the problem of air gaps occurring in floor boards because it relies upon warm air diffusing into the room above. The pipes do not actually make contact with the floorboards/chipboard and instead lie upon foil faced aluminium insulation to help direct heat upwards. However, the presence of air bricks will reduce its effectiveness to less than the estimated 20 to 30W/sqm. Pipe in pug Warm water UFH pipes are laid on insulation sitting on chipboard with the whole suspended between the joists. A dry, weak sand and cement screed or ‘pug’ is poured around the pipe. The resulting heat output is excellent at 100W/ sqm but it is more expensive to install because of the extra labour and you may need heavier joists to carry the weight of the screed. The greater thermal mass will also have a slower response time.There is no blast of heat with UFH. You will not feel heat but you will feel comfortable in the room.
Piping
Although a system may be well sealed, it is possible for oxygen from the atmosphere to be absorbed through the wall of the pipe unless there is some form of resistance in the form of an oxygen barrier, (which now comes as standard but do check), either aluminium or EVOH plastic, both of which are equally effective. Cross linked polyethylene, polyethylene with an integral aluminium layer and polybutylene are the three main types. Cross linked polyethylene (PEX A) is the most popular one in use; it is very pliable but does require fixing into position. Polybutylene is slightly easier to straighten and lay in place. You may also find some installers add corrosion inhibitors to the heating system water as an additional protective agent.Testing the system
A reputable installer will test each part of the system before it is covered. Typically it will be tested to the rating of the pressure relief valve plus 10 per cent. In a standard low-temperature-low pressure heating system, the test pressure would be 3.3 Bar. UFH systems operate at a working pressure of between 1 Bar and 1.5 Bar. If there is any area of weakness it will immediately show at this stage before the pipes are covered. Failure to do this test could give problems later once the floor is covered and you try to find the trouble spot. The pressure test also covers the fittings which should carry the same certification as the pipework. The choice for pipe connection fittings lies between plastic push fit, or brass compression fittings, both of which provide a secure junction. Care must be taken when using brass not to either over tighten and damage the pliable plastic of the pipe, or underdo and not be secure. In any event, the pressure test will expose any faulty connections. Note that unless there’s been a mishap on site (nail going through a pipe which had to be mended with a fitting) there are no joints in the pipework – these should all be at the manifold (continuous loop for each zone). Water is normally used to pressure test a system as it will give the pressure meters a more instant reading (air escapes slowly, think of slow punctures on tyres). But if your UFH system is installed in the winter months before the house is protected from the elements, the pipes could be susceptible to frost so air testing may be the best option as your installer may not necessarily remember to flush the system after testing.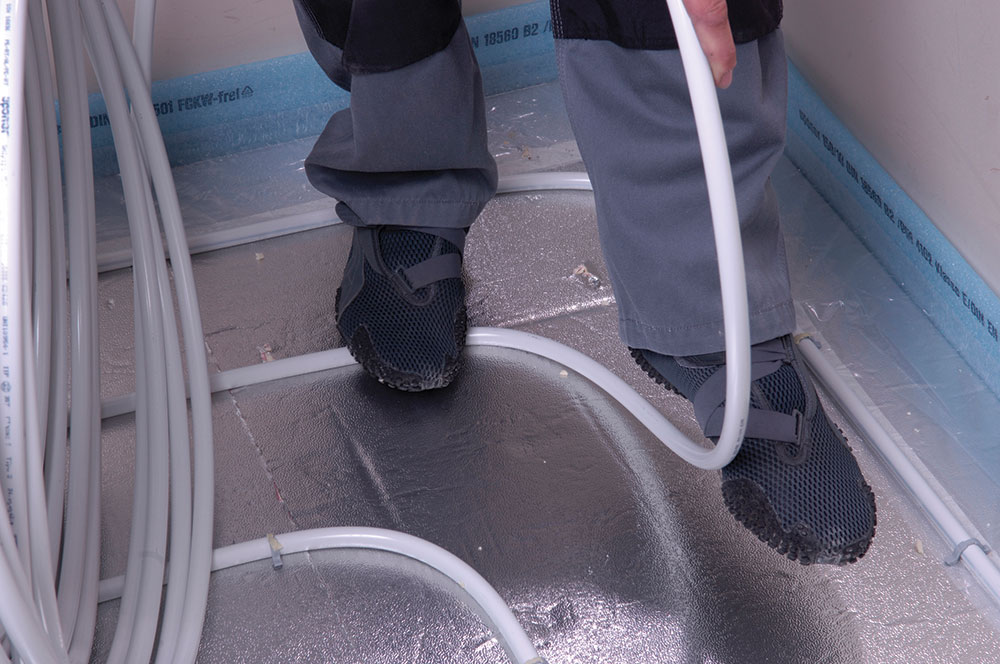
On Top
Because all materials differ in their ability to conduct heat, what you intend as the final, visible, walked upon surface must be allowed for when designing the UFH – the correct thermal conductivities must be added to your calculations. The better the conductivity of the surface, the quicker the response time will be and less heat output will be required to achieve a comfortable temperature and so there are fuel efficiency gains also. Natural wood A moisture content of 10 to 11 per cent is necessary to reflect the ambient conditions of most modern homes. Wet plastered walls and a wet poured floor screed will all raise the moisture content of the air considerably above that of the new flooring, so, naturally, the timber will absorb moisture and swell. If you lay it at this point then it is only to be expected that, when the heat is turned on, it’s going to dry out and shrink, causing gaps to appear. If you’re in a hurry, use a dehumidifier. You should also seek the advice of your flooring supplier as they will have lots of experience of different types of installation and will, of course, want their product to live up to your expectations. Wood is an insulant, so if you go with this option 25mm thickness is the max; also avoid a buildup of timber boards over ply. Engineered wood On a solid floor an engineered finish is generally preferable but a hardwood finish is also possible; in this scenario the planks ‘float’ over a 2 to 3mm sheet of foam underlay with expansion gaps left around the edge (the gap is small enough to be covered by the skirting board). An alternative to the foam underlay is to lay marine ply directly on top of the screed, with the finished hardwood or engineered floor secret nailed to it. The wooden boards should be tongued and grooved and glued laterally making a single piece that lies on top of the foam underlay. It should not be fixed down, unlike a suspended floor where solid planks can be nailed to the floor joists. Beech floors are best avoided as they crack easily, even at low temperatures. Laminated flooring should sit on a layer of flooring grade chipboard laid on the joists, or, if it is a ground floor, marine ply which is more resistant to moisture. Stone, marble and slate These should be between 20 to 50mm thick and set in a bedding with an additive to allow for slight swelling and shrinkage – natural materials again! It’s also a good idea to add some flexible adhesive to the grout. Because of their good conductivity, stone, marble and slate are excellent with UFH, but remember that the thicker the flag the slower the response time. Tiles Ceramic and terracotta, like stone, slate and marble above, are good conductors, that is they do not inhibit the passage of energy from below into the room. Make sure they are laid with adhesive and grout compatible with UFH. Note that the UFH should not be running before, during and immediately after laying. Some brittle stone or tiles such as Terracotta can often get a hairline crack due to the settlement of the under structure, so a Latex additive could be used with the grout. Attention should also be given to adequate expansion joints in large areas and also weak points such as doorways between tiled rooms. Linoleum, PVC and vinyl Not all vinyls are compatible with UFH so check their temperature range for suitability. The tiles are glued directly onto the cold screed which should be left unheated for 48 hours after laying. Use an adhesive formulated for UFH. Carpet Despite what you may think, carpet won’t be an issue as long as the TOG value is 1.5 or less. However the underlay may be: felt and rubber crumb types are best avoided. Instead choose one with good conductivity that is especially designed for use with UFH. Polished Concrete There is a growing trend in houses to use polished floor screed rather than laying a traditional floor covering. This obviously works very well with under floor heating as there is no floor covering to resist the transfer of heat from the screed into the room but beware of rugs.Why Underfloor Heating?
• The most visible difference is clear walls and no radiators to get in the way of curtains and furniture. Radiators can have sharp edges and sometime get very hot. They also tend to make a ‘ticking’ noise as they warm up and cool down. • Equal heat distribution: all parts of the room will be at the same temperature. • In older properties, it is well known that modern central heating is not good news for antiques because it dries out the air more than UFH. • Dust allergy sufferers feel better because with fewer air currents dust particles do not travel so freely. • Carpet mites need both warm air and moisture to breed. UFH produces a drier floor surface than convection systems where the floor tends to be the coldest part of the room. • Fewer air currents means fewer draughts – even a warm draught gives a cooling sensation. • UFH works particularly well with the new generation of heating systems including heat pumps, condensing boilers and solar collectors, but can equally be used with standard boilers or stoves. • Feel good feet factor! It is no coincidence that aromatherapy, acupuncture and especially reflexology concentrate on the feet; they are not only extremely sensitive but also critical to our feeling of wellbeing, as is warmth.Original article by Gillian Corry updated by Astrid Madsen.

