How to finish for your external Insulating Concrete Formwork (ICF) wall.
In this article we cover:
- Render types suitable for use with ICF: types and how they’re installed plus watchpoints
- Other options including stone and timber
- How to get the best result from your chosen finish
- Top tips to make sure your ICF build goes to plan
Now that your ICF building is weathertight, the next step is to apply a finish to the external wall.
ICF external render
A traditional sand and cement render is a cost effective solution but it is not acceptable on EPS as it will not bond to the EPS and the weight of the render will ultimately cause it to slip off over time.
Most of the ICF houses I have completed to date have received an acrylic render system externally, giving a traditional render finish. It has to be an approved BBA (NI) / NSAI Agrément Certificate (ROI) system for use on EPS walls.
[adrotate banner="58"]
All ICF render systems provide a robust wall with high resistance to hard and soft impacts likely to be associated with daily life situations.
My top tip for rendering is to wait until the ICF is fully dry if it has been exposed to the elements for a period of time during the construction period.
Very important is to only apply the render in the specified temperature and weather conditions. This can be checked with the rendering contractor. Next comes the question of the best way to apply the render, and there is no best solution.
You have the option of a spray gun application or with a hand trowel. Either way, make sure that the scaffolding is away from the wall enough to allow for the installer to safely apply the render without the scaffolding being in the way and without leaving a gap big enough for the installer to fall through. On many occasions I have seen the line of the scaffolding on the finished render.
Rendering is usually a four stage process: bead it in two days, apply the base coat over three days, primer over a day, and then the final acrylic render which usually takes three days. If sprayed on, there might be two applications of the final acrylic render. Know that if a coloured render is used it may discolour with time.
You will probably need to recoat the render every 18-20 years. This means that you will have to reapply the final layer of the acrylic render system (trowelled or sprayed) by an improved installer. This may afford you the opportunity to change the colour if you so wish.
Other options
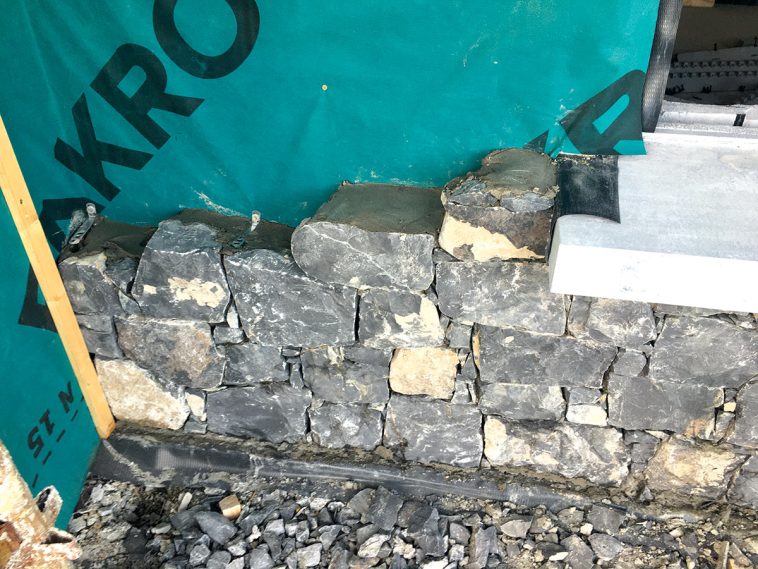
Much like a traditional block dwelling you can also use different forms of external finishes such as the most commonly used one, stone. Top tip for this is make sure you have a damp proof membrane between the EPS and the stone cladding and also have the wall ties drilled in straight after the concrete pour.
This way your stone mason can tie stone in as he builds it rather than trying to make the stone courses work to the walls ties that may have been set in the EPS prior to the pour.
Another finish I have used is external timber cladding both laid vertically and horizontally. Again, a damp proof membrane should be used between the EPS and timber battens.
ICF external finishes: Top tips

Shaun Ingram of Eco Celt chats through the different types of finishes and shares his top tips for each.
The most common finishes for ICF include dry dash, brick and stone cladding, or a thin coat render made of acrylic or silicone resin.
Mid weight build ups such as dry dash and brick slips (up to around 30kg/sqm) would normally have mushroom fixings applied through the mesh reinforcement layer so that some of the load is transferred back to the concrete core. Heavier build ups such as stone cladding should be secured primarily by the concrete (e.g.expanded metal mesh or ties fixed back into the concrete). Your cladding or ICF supplier will be able to provide specific guidance for your situation.
Light render systems can be applied without extra support. However, because ICF surfaces tend to be very smooth, the installer will give the surface a light rasp to provide a key for the render. ICF renders are commonly thinner than traditional cement render so it’s important that any irregularities are taken out of the wall before starting. The surface should be checked with a long straight edge for areas that have bowed outwards during the concrete pour and these should be rasped back. Deep pits should be dubbed out flat. Good preparation will ensure less material is needed, avoiding unnecessary extra expense.
How to get the best result
Dirt and algae can build up on non vertical surfaces, wash down onto the wall by rain and stain. Certain finishes will be more resistant to this but the risk is best controlled by providing a sufficient overhang at fascias and soffits, good drip details on beads and flashing, and a well defined throating and projection on mouldings and sills. Avoid rust stains by using stainless steel (or other corrosion resistant) fixings. Quality UV resistant mastics will help prevent water ingress but these shouldn’t be relied on completely. They should always be paired with a redundancy such as damp proof courses, secondary seals such as compression/sealing tapes and upstands/stooling to sills. Water ingress into the system could potentially result in the finish delaminating if it weather.
Ensure that your render supplier has provided a specification for your project and that your installer is familiar with it. Mistakes at this stage can be costly down the line. Care should be taken to respect temperature ranges for application and to protect the surface from rain and strong sunlight whilst it cures


