It’s possible to build your own home doing almost everything yourself, as long as you have the necessary commitment, time, energy and knowledge.
In this article Andrew Stanway covers what you need to know if you plan to go DIY on your build, including:
- How to save money with a DIY build
- How to determine if you’re up to the task
- What DIY build methods are available in Ireland
- Timber frame options
- Details of what it takes to stick build
- The make your own wall panels method with visual guide
- How to save money with a DIY build
- Certification and other watchpoints
Although it might be tempting to think you could prepare yourself for your DIY build by attending evening classes, or learning from online tutorials, the vast majority of even quite talented DIYers simply cannot hope to become skilled enough at most even basic building-trade tasks to do a really good job.
Ironically, if you want to build what would be regarded as an eccentric structure (straw bales, rammed earth, etc.) the chances are you’ll be able to find very good training and could make a real success of it. But these may be hard to get certification for.
But if you’re trying to mimic a more standard type of build such as would otherwise be done by a main contractor, you’ll find it very much harder.
Few architects or designers have any experience of designing for a total DIY build, so can be disappointing in this respect.
DIY build methods
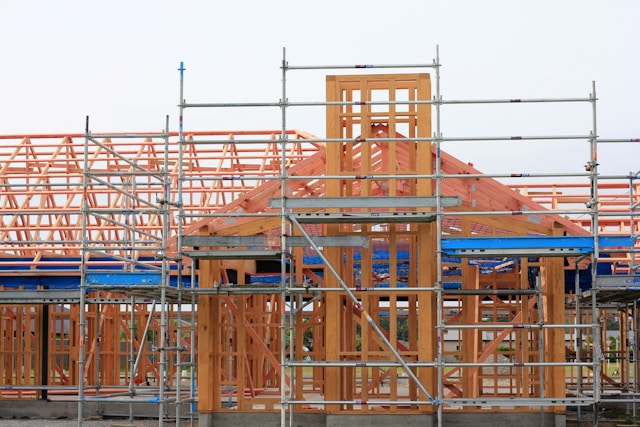
By far the most sensible and achievable route to a DIY build is timber frame. The hands-on skills required are minimal (if you can measure accurately, use a nail gun and a power saw), and the results encouragingly fast. The end product can also be eco friendly and airtight without too much trouble.
As soon as I say this to people, they at once assume I mean, ‘Go out and buy a kit house’. But this isn’t the case. Kit houses made off-site have very substantial fixed overheads designed into their pricing.
Many self-builders are seduced by the speed of build using factory kits but although kits appear cheap at first glance, by the time you add in all the extras on offer (their marketing departments are, understandably, keen to maximise profits) and the cost of cranes etc needed for installation, this method is rarely as cost-effective as it at first appears.
They do, however, have the advantage of being acceptable to lenders, insurers and Building Control (NI) and can offer a turnkey solution which is seductive if you can afford it.
Of course, kit houses are not usually strictly DIY systems. You, the owner, don’t do the work on the walls, roof and so on. Many people do, however, use a kit company to get them watertight and then take over and do everything else themselves.
There are, realistically, only two truly DIY methods that can be made to work: Stick building and ‘Make-your-own-panels’ building.
Both methods require that you get a qualified professional to carefully design everything with DIY construction in mind in the first place, to be sure the structural calculations will satisfy Building Control, lenders and insurance companies.
This is not something you can do yourself. And you’ll need to rely on your own high-quality carpentry to ensure airtightness and structural integrity.
The statutory checks will include an energy assessment (done by a qualified professional) along with a plan to minimise thermal bridging and achieve the required/statutory level of airtightness.
DIY stick build
A method also known as the Walter Segal method, having been developed in the 1960s and 1970s by the architect of the same name. The idea is to use simple designs, locally available stock timber products, basic hand tools, and entirely your own time and skills.
In its purest original form there were no wet trades (bricklaying, plastering, etc.) but most commercially built stick builds today involve all kinds of professionals.
Starting with very simple foundations there is also no concrete in Segal’s simplest method as it was originally intended for single storey builds.
Stick building involves first framing everything out in timbers then fixing OSB or plywood boards to the sticks. A variant of this simplest form of the method is to construct a strong, timber post-andbeam ‘frame’ that you then infill with normal stick-built walls.
A problem with stick building is that all the verticals need bracing to provide strength before the outer sheathing goes on. It needs more than one person to do this.
For a project in Ireland, see how carpenter Chris Gillick built his stick build here.
Make your own wall panels
Getting materials from a trusted local supplier and making up your own walling units on site is both quick and simple. In effect, you’re replicating in a DIY way what the kit suppliers do in their factories. Of course, you won’t be able to match their quality control or even their materials but if it’s a true DIY build you want, this can certainly work.
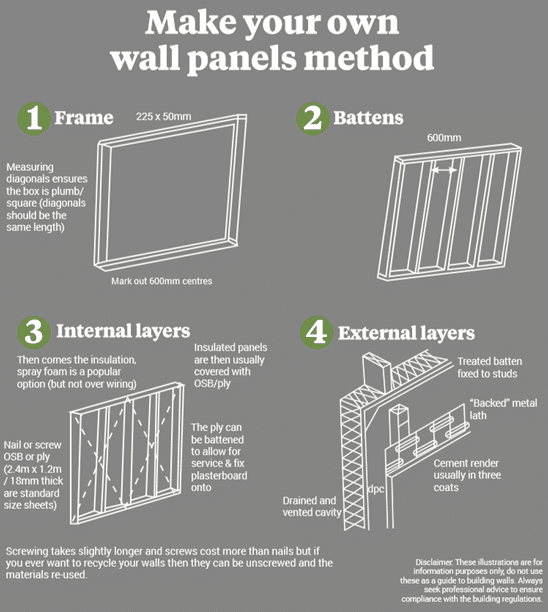
The ability to use this method on your own also has to be offset by the extra cost of the timber involved. At the junction of each panel or box there are always two uprights. This makes things very strong and can be a great edge for a window or door frame to fix to, but does increase the timber bill compared with pure stick-building. The main advantage of this method, though, is that constructed wall unit can be handled on your own. The only time you’ll need another pair of hands will be when handling factory-made roof trusses which might need another person for a couple of days.
The heaviest thing you’ll lift alone will be a completed wall unit which you’ll have made on the floor, then pulled into place before finally fixing it.
The make-your-own-wall-panels method has more cold bridges where two panels meet (with their double-thickness of vertical timbers). Whilst timber is a good insulator it is not as effective as the same volume of actual insulation. To some extent this can be overcome by doubling up on the inner skin.
Common ground
In both cases design everything from the start so wall sizes are multiples of eight-by-four (2.4mx1.2m) whenever possible. No waste and very quick.
Whether sick-building or panel building; when it comes to fixing the frame, you can bolt the sole plate down, strap it in place, or use fixings that have been set into the slab, like with the kits.
The main thing is not to penetrate the damp proof course (dpc) under the sole plate. The soleplate must be fixed into place, levelled, on its dpc etc before standing your self-made panels on it.
Fitting out inside isn’t usually all that demanding with either of the wall construction methods. Internal stud walls, even if they’ve been designed to be load-bearing, are easy to erect.
Stairs, doors, skirting, architraves and kitchen joinery are usually a matter of common sense and even first fix plumbing and electrics can easily be achieved if you have good tradesmen to guide you before you start and who will sign off on the job at the end .
Remember that electrical and gas installations have to be done and signed off on, by registered tradesmen.
In both cases the outer surface of your panels will need waterproofing, then covering with some sort of rainscreen cladding, in the normal way.
Of course, the self-build ‘industry’ isn’t geared up for this simple level of thinking as TV programmes and other media encourage you to think bigger than you want or even need.
In Ireland we’ve been seduced into thinking that DIY construction like this is too hard and unsatisfactory but this is crazy because around the world it’s the most common method of homemaking.
Beautiful, high-end homes are built like this in their hundreds of thousands every year in the US and Canada, for example. The cost per square metre is low, the speed of construction high and the quality and eco-credentials as good as you’ll ever need.
The secret, then, is not to try to become a ‘main contractor’ and build a house that a mass-market housebuilder would but to focus on one of these simple, tried-andtested methods that will give you the result you want at a price you can afford.
Remember! Do not start on any building work until all statutory requirements are in place and you have consulted with a qualified design professional.

